Showing posts with label Tips. Show all posts

Saturday, February 21, 2015

Trader Joes Favorites


I remember walking into Trader Joes for the first time and not knowing what to buy and leaving with 3 items not sure if I was going to like it. Now I walk in there and am afraid I'm going forget something or miss out on a new fun item. However it has taken time for me to find just what I love. Yes I have bought some stuff that was average and even bad. 

I'm writing this post to help those who have never tried them or is looking for some great items to add to their pantry. I can't tell you how many times I have seen friends on Facebook share their favorite items and that is how I have learned about many of them. I hope this post helps you find some new favorites also. 

The coconut cream above is a new favorite I found and now use it in my Panang Curry recipe. It is super thick and a little sweet. It makes for a great sauce and now I keep a can in my pantry at all times. I have tried many coconut milks and none of them have been this good. 


These rice crackers are the best out there. I have tried many and none compare to these. I love the taste of sesame and they are also perfectly salty and crunchy. Some rice crackers are too bland and make me feel like I'm going to break my tooth. Not these. These are the best and another staple in my pantry. A bonus is that everyone in my family loves them. 

These are a great freezer find. It has cauliflower, carrots, peas and corn. They are easy to prepare and have butter and herbs in them. They are super fresh and great in a pinch. 

These veggie sticks are the best. We have tried many and the kids usually wont eat any others. these are perfectly crunchy and salty. The only problem is they don't last long so I usually buy two bags. 


I've never liked pasta prepared in the freezer section but I decided to give this a try and now there is a bag in my freezer at all times. It makes a delicious sauce and barely feeds two but because it makes a lot of sauce I always add more cooked penne and easily feeds four with a salad on the side. 


I was at Trader Joe's and they happen to be sampling this cornbread. I instantly fell in love and this is now a must have in my pantry at all times. I have tried many mixes but this doesn't even taste like a mix. 

It is also the best place to buy nuts, hummus, pesto, and olive tapanade. You can always get a good deal on fruit and vegetables. I'm not a big fan of their bread but for the most part they have many favorites and sometimes they are cheaper than most stores. Let me know if you have any questions or if you have some items I should try. 

Tuesday, October 1, 2013

Lin's Restaurant Style Salsa


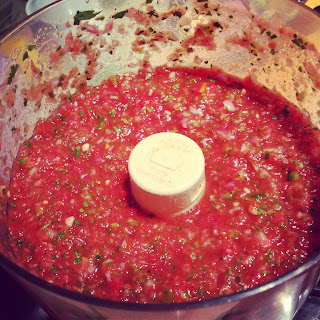
Every year I go home for the summer I look forward to my brother-in-law's fresh salsa. This year I was surprised to see my sister Lindsy made one just as good but with canned tomatoes. I didn't think it would be as good but I was pleasantly surprised. What I liked most about it was the canned tomatoes made it taste more like restaurant style salsa that I grew up on. I also liked that I could use canned tomatoes and then I don't have to worry about the tomatoes being in season or too mealy.

It is ridiculously easy to make and quite affordable. Since I've been back from vacation I've made it 3 times and can't seem to keep in my fridge for longer than a week. Try it and let me know what you think. 

Ingredients
1 (16oz) can of Hunts diced tomatoes
1 jalapeno seeded
1 lime
1 handful cilantro
1/2 red onion
1 clove garlic
salt and pepper to taste

Directions

In a food processor add can of diced tomatoes. Then add jalapeno cut into about 4 pieces, squeeze lime, add cilantro, add 1/2 onion depending on how big it is cut up into four big pieces, add garlic, and salt. Pulse until you get the consistency you like. Taste and add more of what you like. 

My sister does not add garlic to hers but I just add one clove because I love the taste. You can choose to leave it out. I seed my jalapeno because it can get super spicy. Sometimes however I only add half of a jalapeno and leave seeds in. Red onion and garlic also add spice to this so you have to be careful that it can get too spicy. Add more lime juice to help bring the kick down a bit. 

Try it and let me know what you think. 


Friday, June 21, 2013

Homemade Taco Seasoning


I finally ran out of store bought taco seasoning. I had no choice unless I wanted to run to the store so I googled it and found a recipe on All Recipes. I quickly saw that I had all the ingredients and decided to give it a try. I was happy to see I could alter the spiciness because my son has had acid reflux and his stomach is very sensitive to spice. 

I was very pleased with the taste and to know just how much salt is going into it. What I loved was it wasn't as salty but still very tasty. Give it a try and let me know what you think. 

Ingredients
  • 1 tablespoon of Chili powder
  • 1/4 teaspoon garlic powder
  • 1/4 teaspoon onion powder
  • 1/4 teaspoon red pepper
  • 1/4 teaspoon dried oregano
  • 1/2 teaspoon paprika
  • 1 1/2 teaspoon ground cumin
  • 1 teaspoon salt
  • 1 teaspoon pepper


Directions
Add all ingredients and mix together in a small bowl. Brown ground turkey or beef and then add this mixture to the meat. Pour 2/3 cup of water to the pan and simmer until liquid cooks into the meat. 

Thursday, December 20, 2012

Cleaning Cast Iron Skillet

Cleaning a cast iron skillet can seem quite difficult but it is actually quite easy and if you take good care of it, it will last you many life times.

I received my first cast iron skillet as a wedding gift. I thought it would be great because it was not seasoned and I was so excited to season it myself. I followed the instructions and and failed miserably. For some reason it came out sticky and stayed sticky. No matter what I did I couldn't get the sticky substance off. I got fed up and gave it away and stayed away from those pans for a very long time.

About 8 years later I went to the Martha Stewart Show and they allowed the audience to ask questions. I asked what I did wrong with seasoning my cast iron skillet and she said why would you ever buy one not seasoned. That wasn't exactly the answer I expected but I realized then I need to go and get a seasoned one immediately.

I received one as a gift last year and absolutely love it. It makes the best burgers and steaks. If you don't have one you should get one. They are inexpensive and perfect pan for heavy duty cooking.

Here are my tips on cleaving them. I watched an episode on Martha Stewart of a man showing how to clean them and now I am no longer afraid. I used to clean it with kosher salt because I was afraid soap would ruin it.  Well he used soap on his and he makes these pans for a living so I figured he must know.
Step 1. After you soaked the pan with super hot water take a brush and a little soap and scrub off all the bits stuck on the pan and rinse with hot water. 

Don't be shy it is a very sturdy pan and can handle quite a bit. 


Step 2. Rinse all the soap and bits off with very hot water.


Step 3. Dry it immediately and thoroughly. Water will rust your skillet so it is essential to dry it.


Step 4. Add a little vegetable oil in the pan to season it. It is important to season it after every wash so it stays nice for you for years to come.

Step 5. Use your paper towel and rub the oil into the pan thoroughly. It seems strange and once rub in all the way it is not sticky and ready to use for your next use.

Voila!!! 

Monday, November 19, 2012

Chicken Spaghetti


I am a huge fan of The Pioneer Woman's cooking show. I think what draws me there most is that she cooks for a busy family and I can relate. I first saw this recipe on her blog and they way it is described on there I didn't find it appealing. Then I watched her make it on the Foodnetwork and my mouth started to water so I thought I have to give that a try. I went to her blog to get the recipe and realized it wasn't the same. I went to the Food Network and it was different so I printed it instead and made it for my family. 

My kids are not fans of cheesy pasta so I took this recipe and put it in two small 9X9 pans instead of one 9x13 pan. One I put in the freezer and the other me and my husband devoured. Luckily there was some left over for another night because it was big hit. I also loved that I could take the other half out of the freezer on a day I just didn't feel like cooking. 

I wish my kids were like Ree's but they are just not willing to eat everything I make. So when they wont eat cheesy pasta I make them plain pasta with a little butter. I also changed the recipe slightly so if you want it exactly like hers click her name above and it will take you there. 


Ingredients

2 heaping cups cooked chicken
3/4 pound spaghetti cut into 2 inch pieces
1 can cream mushroom soup
2 1/2 cup grated sharp cheddar cheese
1/2 of a large onion finely chopped
1 cup low sodium chicken broth plus more if needed
1/4 cup diced green bell pepper
1/4 cup diced red bell pepper
1 tsp seasoned salt
1/8 tsp Cayenne pepper
salt and pepper

Directions

Preheat the oven to 350 degrees F.

Bring a large pot of water to a boil and cook spaghetti for 9 minutes. Do not overcook, if anything slightly under cook it. When the spaghetti is cooked, combine with the chicken, mushroom soup, 1 1/2 cups cheese, the green peppers, red peppers, onions, seasoned salt, cayenne, and sprinkle with salt and pepper. Stir in 1 cup chicken broth, adding an additional cup if needed. You don't want it too dry.

Place the mixture in a casserole pan and top with the remaining 1 cup cheese. Cover and freeze up to 6 months, cover and refrigerate up to 2 days or bake immediately until bubbly, about 45 minutes. (If the cheese on top starts to get too cooked, cover with foil).
Ready to freeze


Tuesday, August 14, 2012

Pub Mustard

Many many years ago I worked at the Nordstrom Cafe. No matter how many years ago it was I could never forget their club sandwich with pub mustard. I tried to find it at every store I've ever been to and then decided to see if I could make it. I found a recipe on line after googling it and was so excited to try it. I hated the idea that every recipe I found called for 2 cups of dry mustard because it is so expensive. I found a large bottle at a discount grocery store and it turned out horrible. I guess you get what you pay for. Well I went out and bought Colemans and decided to cut the recipe down so I could make a little and if I hated it well then it didn't cost too much.

This time it turned out amazing and we had club sandwiches several times after just so we could eat this mustard. If you never had pub mustard it is a sweet spicy thick mustard that gives your sandwich that extra kick. That is why when I worked at the Nordstrom cafe they only gave you a tiny little cup on the side. I am so happy that I no longer need to search for this mustard and can make it when ever I want it. Try it and let me know what you think.

Recipe for Pub Mustard

1/2 Cup dry mustard
1/4 cup brown sugar (you can add more if you like it sweeter)
1/2 teaspoon salt
1/8 teaspoon turmeric
4 ounces of strong British ale flat

I just added all ingredients and whisked with until fully incorporated. It says to do it in a blender but I didn't feel it was necessary the second time I made it. I also added the beer slowly until you get the right consistency that you like. It thickens as it sits and taste better after sitting for a day. 


Recipe for the sandwich

1/4 pound of thinly sliced honey ham
1/4 pound thinly sliced honey turkey
2 slices of sharp cheddar cheese
3 tablespoon mayo
2 slices of tomato
1 slice of roman lettuce
3 slice of french bread lightly toasted

Directions

1st layer is mayo, ham and lettuce. Then the 2nd layer is mayo, turkey, tomato, and cheddar. Then top sandwich with another slice of bread with mayo. Cut in 4 triangles and put toothpick in through each piece to hold it together. Add pub mustard on each bite just a little and then add more if you enjoy that extra spice. 
1st layer mayo, ham and lettuce


2nd layer mayo, turkey, tomato, cheddar
Try it and let me know what you think.

Sunday, July 29, 2012

Popcorn with Nutritional Yeast Flakes


I found a new recipe for popcorn that I love more than my other popcorn post. I honestly didn't think it was possible and I really never believed I would find one that is actually good for you. I was at a friends house and she was making popcorn for her son's baseball game. She said it had nutritional yeast on it and I almost gagged just at the name alone. I smelled the these flakes from the a bag and thought GROSS. But I am always willing to try just about anything. I took a couple of bites and all of the sudden I couldn't stop eating it. She was nice enough to make me a bag and I took it home to my mom to try. I knew I could never tell my mom what was on it or she would never try it. After she ate 3 handfuls and told me it was good I then divulged the ingredients to her. She loved it and bought us a popcorn maker so we could make it whenever we wanted some.

This recipe given to me by Cindy Sawyer also founder of Towelocs If you have never heard of these you should click on the link and check out this great product. They make life easier for all you moms out there who are tired of picking up the towel after your kids pull them off the ring to dry their hands.

Recipe
2/3 cup of popcorn kernels
2-3 tablespoon grape seed oil
1-2 teaspoons of salt
3 tablespoons of Nutritional Yeast Flakes

Directions
I pop my kernels in an air popper but if you don't have one you can put the kernels in a brown paper lunch bag and pop them in the microwave for about 4 minutes (Don't add oil).

Once the kernels are popped add a little oil, a little flakes and salt. Mix well and then continues to add a little more until it is all covered well and taste. You might want to add more or leave some out depending on your taste.

The best part is this popcorn is quite good for you. Nutritional Yeast has vitamin B12 and used by many Vegans as a substitute for cheese. If you don't like cheese flavored popcorn you probably won't like this. I tried it on many of my family members and the only ones that weren't impressed was those who don't like cheesy popcorn. Give it a try and I am warning you now it is hard to stop eating it.


Thursday, April 19, 2012

Marinade

I love marinating pork, steak and chicken. I have learned that an easy way to do this in a bag so that you don't have to touch it and re open it each time you add something. Stick the bag in a medium to large size plastic container. It helps keep the bag open and in place. Then when you are all done adding ingredients and meat you should wash hands, seal it and then nothing gets contaminated. Give a try the next time you marinate your meat. I guarantee you will do it this way from now on. Here are the ingredients for this marinade. I love pork tenderloin and this one happens to be a favorite of the entire family. 

Ingredients

4-5 garlic cloves minced
2 tablespoons balsamic vinegar
2 1/2 teaspoon salt
1/2 teaspoon pepper
2 tablespoon olive oil

Check out the whole pork recipe here.

Monday, January 30, 2012

Dinner Planning

I have had a few people ask me how do you plan your meals with all the other stuff you have going on? I am a stay at home mom and in order for me to manage it financially, I can't order food or eat out often so it takes a little planning to make sure I have something to cook every night. The way I found to be the most successful is to plan 3 days in advance. I will sit down and think to myself what do I want to make for dinner for the next 3 days? I am not the kind of person who likes to eat the same thing every Tuesday so I will usually think of a couple of items I know we like and maybe one new recipe on the third day. For example:

Monday I want Chinese so I think I will make:                Chicken Chow mein  
So I will write down all the ingredients I need on my grocery list. I then think ok Tuesday I will have beef so how about for Tuesday I make                    Steaks

Then by Wednesday I would like something without meat like pasta or I will also use a leftover from Sunday like chili

To me it is too difficult to plan a week in advance but 3 to 4 days has always been easy for me. This way you are going to the store every 4 days. To some people it may seem like a lot but let me tell you this way you use up all the food and your produce doesn't go bad. Just a little planning also keeps your from getting frazzled thinking about what are we going to eat tonight and then just ordering out. I noticed I will spend the same amount on one dinner from a restaurant that I would have for 3 days. My grocery bill used to be easily over $100 dollars each week and I was always throwing something out. Now it is smaller increments because I am going about twice a week less stress and we use up everything. Give it a try and let me know what you think or if you have any questions. Don't get me wrong I do sometimes get too busy and unable to get to the store so we end up throwing something together from the freezer or pantry or just ordering pizza. 

Monday, January 23, 2012

Cleaning Microwave

I don't think anyone likes cleaning a microwave. Let's face I don't like cleaning anything. If you are as busy as me you don't get the chance to wipe it down every time you use it and it starts to get splattered and smell like the food, then this is the best trick for you. I bought a book a long time ago called the Queen of Clean and learned a very cool trick to cleaning my microwave easily and it smells wonderful when I am done.

1st cut a lemon in half and stick it in about 2 cups of water in a microwave safe bowl. I added another old piece of lemon just because I was about to throw it out anyway. 2 nd put the bowl of water and lemons in the microwave and cook on high for 3 minutes. Sometimes 3 minutes is just enough depending on how dirty the microwave was. If it is very moist inside and all the stains look wet then you are done. If not do it for another 3 minutes. 3 rd remove the bowl and plate and spray with a mild cleaner. You don't need the cleaner but makes it just that much easier to wipe. I have used cleaner on the tougher messes but most of the time you don't even need a cleaner. 4 th wipe with a sponge and clean your plate and it should turn out sparkling and smelling like lemons or no scent at all.

Try it and let me know what you think.

Sunday, December 4, 2011

Apple pie tart

I love making apple pie but I have the hardest time rolling out dough. I follow exactly what Martha Stewart does on her show but every time my dough rolls out more like a snow flake than a circle. Hers is a perfect without any cracks and mine looks like a kid had a go at it. Now I don't have marble counters. I have those cheap laminate counter tops that I can't upgrade because this place is a rental. This apartment is like the inside of furnace year round so my counters are too warm and the dough sticks to it. I tried the rolling it between 2 sheets of plastic wrap but that really only works on tv. I was flipping through one of my food magazines and found this recipe and thought it was brilliant. I changed it slightly and I have to tell you it is the best combination of an apple pie and tart. They called it apple pie cake but I thought it was more like a tart than a cake. The crust is flaky on the bottom and the crumb on top is buttery and crunchy. If you too like apple pie but hate rolling the dough then this is what you've been looking for. Give it a try and let me know what you think.

Ingredients

2 c. Flour
1 c. light brown sugar
2 tsp. cinnamon (divided)
2 sticks of cold butter cut into small pieces
6-8 granny smith apples
2 tbs sugar

Recipe

In a food processor combine flour, brown sugar, 1tsp cinnamon and butter. Pulse until mixtures forms pea size pieces. You can also use pastry cutter if you want to do it by hand. Press 2/3 of the mixture into a spring form pan and about up 1/2 inch up the sides. Put it in the refrigerator while you prepare apples.


Pre heat oven to 350 degrees. Peel, core and cut apples into thin slices. I use a tool that does all of this at one time. It is great because it is super fast if you have kids they will love to do it with you. Check out the video of my son helping at the bottom. Toss the apples in a large bowl with remaining tsp of cinnamon and sugar. Put them in the prepared pan.


sprinkle the rest of the crumbled mixture over the top of the apples. place on top of a cookie sheet and bake for 1 hr. or until golden Brown. Let cool completely and then release pan.