Pages

Friday, October 26, 2012

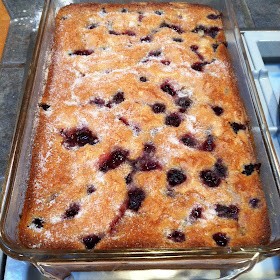
Blackberry Cobbler

I Turned on the food network about a year ago and saw my very first episode of The Pioneer Woman. She made this Blackberry Cobbler. I am usually not a big fan of cobbler I tend to like a crisp more but this was a recipe I couldn't get out of my mind. I waited until blackberry season to give it a try and made it over the summer TWICE.

It was so easy and so good that I had to make it more than once and I had to share it with all of you. I had never used self rising flour so it was the one thing I had to run to the store to get and was worried I wouldn't be able to find it in a regular grocery store but they had plenty. Most of us do not have fresh blackberries right now but you can make it with frozen also. Try it and let me know what you think.

Ingredients
1/2 stick of butter
1 1/4 cups plus 2 tablespoons sugar
1 cup self rising flour
1 cup whole milk
2 cups fresh or frozen blackberries
whipped cream and or ice cream for serving

directions
Preheat oven to 350 degrees. Grease a 3 quart baking dish with butter.

In a medium bowl , whisk 1 cup sugar with the flour milk. Whisk in the melted butter.

Rinse the blackberries and pat them dry. Pour the batter into the baking dish. Sprinkle the blueberries evenly over the top of the batter. Sprinkle 1/4 cup sugar over the blackberries. Bake until golden brown and bubbly, about 1 hour. When 10 minutes of the cooking time remains, sprinkle the remaining 2 tablespoons sugar over the top. Top with whipped cream or ice cream.

Monday, October 22, 2012

Mom's Lasagna

Right out of the oven
My mom has been making this Lasagna for as long as I can remember. She makes her own meat sauce and doesn't skimp on the cheese. It is usually an all day event but easy to feed a large crowd. I only get it once a year and because it is so fantastic nobodies lasagna even compares. If you have ever had my mom's lasagna then you probably have asked for the recipe. She is now known for it and you know you are special if she is making it the day your are over. I think it is so good because she puts so much love and attention into it. However if you don't like cheese this is not the recipe for you. You can not be lactose intolerant for this dish. If you do try it let me know what you think.

Ready to bake

Ingredients

1 1/2 lb ground beef
salt and pepper
1 onion chopped
2 garlic cloves minced
2 teaspoon dried basil
2 teaspoon oregano
2 teaspoon parsley
3 cans tomato sauce
1 can stewed tomatoes
1 tablespoon sugar
2 tablespoons water
1 cup sour cream
1/2 cup small curd cottage cheese
1 1/2 cups ricotta cheese
1 egg
1 box Barilla lasagna noodles
3 packages of mozzarella sliced
1 cup parmesan cheese

Directions

To make the sauce add ground beef to a large stock pot and brown on medium heat. Break it up into small pieces (the trick to this sauce to make sure the pieces are very small) and add salt and pepper, 1 teaspoon basil, oregano, and parsley. Once meat is pretty much done add chopped onion and garlic minced. Cook 2 minutes and then add three cans tomato sauce, 1 can stewed tomato cut into smaller pieces. (I use scissors and cut them up right in the can).

Add another teaspoon of basil, oregano, and parsley and 1 tablespoon sugar. Add water and simmer for all day or around 4 hours. Don't let it boil the sauce needs to cook low and slow. (You can make the sauce the night before if you want.) Once your sauce is ready you can build your lasagna.

Pre heat oven to 350 degrees.

Make cheese mixture in a medium bowl. Add sour cream, cottage cheese, ricotta and egg. Using a whisk mix together well.

Using a 9x13 pan take 3 scoops of sauce to cover the bottom of the pan so noodles don't stick.

1st layer add noodle and make sure bottom is covered. Using a spoon add cheese mixture to cover the noodle. Add sliced mozzarella over the cheese mixture. Add sauce over the mozzarella and then sprinkle parmesan over the top of the sauce.

Repeat this 2 more times. Bake at 350 for 30 minutes or until bubbling. Let sit 10 minutes before slicing.


Check out those layers

Monday, October 8, 2012

Blackberry Muffins

I can't say enough good things about my muffin cookbook by Williams Sonoma. I think I have made about 4 different muffins in that cookbook and they have all turned out to be delish. I had been waiting for the summer to try the blackberry muffin. I used fresh blackberries but you can use frozen. 

I made these for my family this summer. As I've said over and over having fresh blackberries outside our house for the month of August was fabulous. These muffins had a nice crispy crunch topping and were liked by all ages. Nothing like waking up to fresh muffins and coffee with my cousins, aunt, uncle, mother and kids. Try them and let me know what you think.


Ingredients

For the topping
1/3 cup sugar
3 tablespoons all-purpose flour
grated zest of 1/2 lemon
2 tablespoons unsalted butter, melted
1/3 cup pecans, finely chopped

For the muffins
2 cups all purpose flour
3/4 cup sugar
2 teaspoons baking powder
1/2 teaspoon baking soda
1/2 teaspoon ground cinnamon
Grated zest of 1/2 lemon
1/4 teaspoon salt
1 large egg beaten
5 tablespoons unsalted butter, melted
1 cup buttermilk
2 cups fresh blackberries or 2 1/2 cups frozen
unsweetened blackberries unthawed

Directions
Pre heat oven to 375 degrees. Butter 12 standard muffin pan with butter or nonstick spray.

To make the topping stir together the sugar, flour, and zest in a small bowl. Stir in the melted butter until the mixture is crumbly. Add the pecans and stir to combine. Set aside.

To make muffins, in a bowl, stir together in the flour, sugar, baking soda, cinnamon, zest, and salt. Make a well in the center and add the egg, melted butter, and buttermilk. stir just until evenly moistened. the batter will be slightly lumpy. Sprinkle with the blackberries and gently fold in with a large rubber spatula just until evenly distributed, no more that a few strokes. Take care not to break up the fruit. Do not over mix.

Spoon the batter into each muffin cup, filling it to a bit above the rim of the cup. Top each muffin with the topping, dividing it evenly (the sugar will melt and produce a glaze effect).

Bake until golden, dry, and springy to the touch, 25-30 minutes. A toothpick inserted into the center of a muffin should come out clean. Transfer the pan to a wire rack and let cool for 10 minutes. Unmold the muffins. Serve them warm or at room temperature, with butter.


Wednesday, October 3, 2012

8 layer dip


I found this recipe in the Everyday food magazine a few years ago. I love layer dips but when ever I buy them at a store I find the flavors blend so much and it becomes very watery. This one looked very good and easy to make so I decided to try it out at a BBQ that we had at my mom's house. It was a huge hit and my mother asks me to make it every year now. It would be great for a game day. I promise you that you it will be the first thing to go and your guests will be asking you to make it again.

Ingredients

1 16 ounce can of refried beans
2 tsp fresh lime juice
salt and pepper
1/2 cup sour cream
1/2 cup grated cheddar cheese
1 4.5 ounce can of green chiles
2 plum tomatoes, seeded and chopped
1 avocado diced
1 cup shredded lettuce
2 scallions

Directions

In a medium bowl, combine beans, lime juice, 2 tablespoons of water and season with salt and pepper. Transfer to a serving dish. Top with sour cream, cheese, chiles, tomato, avocado, lettuce, and scallions. Serve with tortilla chips.

Monday, October 1, 2012

Caramel Apples

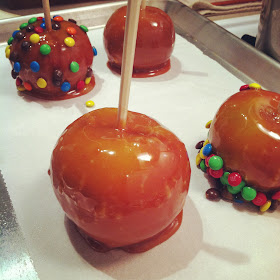
My son goes apple picking with his school every year. He usually comes home with a huge bag of lovely sour apples, perfect for baking and caramel apples. I usually make caramel apples and then some sort of pie. A couple of my favorites are Apple Pie Cake and Apple Tarte Tatin. However, my boys said they made Apple Betty at school and they want to make it at home so we may try that. My little Brody loves apples but thinks caramel apples are disgusting. I didn't think I would ever meet a child who didn't love a caramel but some how I gave birth to one. This time we tried rolling them in M & M's. The professionals make it looks so easy and as you can see by the one closest to you, the rolling wasn't successful. So we decided to place them on the second one. Live and learn has always been my motto. 

I have made my own caramel in the past and have to say I haven't had the best results from it. This version is much easier to do with kids and we all think they taste just as good as any caramel apple I have every purchased at the fair. Try them and let me know what you think. 

Ingredients
I  11 oz bag caramel bits
5 medium apples
2 tablespoons water
5 wooden sticks. (I use the chop sticks from takeout that I never used)
1 cup mini M&Ms (optional)
3 - 4 tablespoons sugar (super fine if you have it)

Directions

Clean each apple and dry completely. Place one stick through the core of each apple. Set up a pan with a piece of parchment paper. Add sugar on top so the caramel doesn't stick. 

Place caramel bits in a small/medium bowl. I don't like the bowl to be to big because it spreads out too much and then you have a harder time using up all the caramel. Add 2 tablespoons of water and microwave for 2 minutes on high. 

Stir the mixture together until all the caramel is completely melted and smooth. Take each apple and spoon the caramel over the apple starting at the top and let the remainder drip to the bottom. I dip each apple in the caramel to coat the bottom. Then you place is on the pan with parchment and sugar to sit. You can then add a topping if you want. We added mini M&M's this time and it was a huge hit but next time I think I will also try crushed up oreo's or even mini chocolate chips. 

Once you have finished all 5 apples put them in the refrigerator for one hour. I make them before dinner so they are good and ready for dessert. 

This is a fun easy treat that your kids will remember for a life time. Unless your child is like my Brody. We keep hoping his taste will change and he will enjoy them with us. He used to hate popcorn but not anymore.