Pages

Monday, January 30, 2012

Dinner Planning

I have had a few people ask me how do you plan your meals with all the other stuff you have going on? I am a stay at home mom and in order for me to manage it financially, I can't order food or eat out often so it takes a little planning to make sure I have something to cook every night. The way I found to be the most successful is to plan 3 days in advance. I will sit down and think to myself what do I want to make for dinner for the next 3 days? I am not the kind of person who likes to eat the same thing every Tuesday so I will usually think of a couple of items I know we like and maybe one new recipe on the third day. For example:

Monday I want Chinese so I think I will make:                Chicken Chow mein  
So I will write down all the ingredients I need on my grocery list. I then think ok Tuesday I will have beef so how about for Tuesday I make                    Steaks

Then by Wednesday I would like something without meat like pasta or I will also use a leftover from Sunday like chili

To me it is too difficult to plan a week in advance but 3 to 4 days has always been easy for me. This way you are going to the store every 4 days. To some people it may seem like a lot but let me tell you this way you use up all the food and your produce doesn't go bad. Just a little planning also keeps your from getting frazzled thinking about what are we going to eat tonight and then just ordering out. I noticed I will spend the same amount on one dinner from a restaurant that I would have for 3 days. My grocery bill used to be easily over $100 dollars each week and I was always throwing something out. Now it is smaller increments because I am going about twice a week less stress and we use up everything. Give it a try and let me know what you think or if you have any questions. Don't get me wrong I do sometimes get too busy and unable to get to the store so we end up throwing something together from the freezer or pantry or just ordering pizza. 

Friday, January 27, 2012

Taco Salad

My mother started making these salads for me since I was about 10 years old. It is very easy to make, light in calories depending on how much cheese and sour cream you use. I love making them in the summer because it gets so hot and I don't want to turn my oven on. However, I also love making them in the winter.

Ingredients

1 bag Tostitos tortilla chips (I like the rounds)
shredded cheddar cheese
chopped Iceberg or Romain lettuce
salsa
sour cream
1 15 oz can Hormel Turkey chili
1 lb ground turkey
chopped scallions

Directions

In a large skillet brown ground turkey. Once it is cooked through add 1 can of your favorite chili. I use turkey chili because it has less fat. I tried the vegetarian but it wasn't as tasty. While that is cooking Line the bottom of your plate with tortilla chips (about 15 of them). Add shredded cheese. You can add just a little cheese if you are cutting back on calories or add none at all. Melt the cheese in the microwave for about 45 seconds. Then layer with ground turkey, chopped lettuce, shredded cheese, scallions, salsa, and sour cream (you can use Greek yogurt).

Let me know what you think. Sometimes I add pickled jalapenos on the top. You can add or take away anything you prefer. I promise it will become a staple in your home once you try it.

Wednesday, January 25, 2012

The Best Hamburger Ever

Notice the lump...that is the relish heating up inside 
I love making hamburgers and most importantly I love EATING hamburgers. I've tried making them many different ways but the one my mom taught me has to be the most delish. She learned this technique from when she used to work at the plaza broiler in Seattle. 

 I wish you could hear the sizzle from the hot pan


I have a few must haves when it comes to the best burger. The meat should be at least 1/2 inch thick. Unless you want it to be a double burger and I do highly recommend that but, then the meat should only be 1/4 inch think. The patty also should be a little larger in diameter than the bun because when it cooks it shrinks quite bit and then you get a bunch of people looking at you like..."where's the beef." Make sure you salt and pepper and don't be stingy. I like cooking mine on a cast iron skillet because it gives the perfect temperature and caramelizing on each side. I usually cook them for about 4 minutes on high on each side. You can do less if you want it more rare in the middle. Make sure your pan is piping hot before you start or one side will not caramelize as well. 

Don't be forget this step
One very important ingredient for this perfect hamburger is a big dollop of relish in the center. Once you flip the burger place the relish in the middle and then your cheese over the top. You can use cheddar or American but just don't be stingy. I like cheddar because it gives it that extra tang. Let the cheese melt over the top sealing the relish on to the burger. 

Butter the bun and don't over toast
While they are cooking toast your brioche roll in the broiler for about 2 minutes. The brioche roll is another factor in making the perfect hamburger. It holds up well. It has the right texture and thickness along with adding just a hint of sweetness. Once you eat a burger on a brioche roll it is hard to have it on any other bun. Just ask my mother. Now everyone is a little different when it comes to what they like on there burger but this is how you should assemble for it to be perfect. 1st Little bit of may on the bun with ketchup and mustard. 2nd My mother insists you place shredded lettuce on the bottom, tomato slices and thinly sliced onion. Then place the hamburger on top. The combination of all this and the relish oozing out warm is pure heaven.

As you can see I went against my mom and put my stuff on the top. They both make the best hamburger ever. Try it for dinner or lunch and let me know what you think.

Tuesday, January 24, 2012

Pork Tenderloin

Don't you get tired making the same dishes all the time? I've never been one of those people who can eat the same dish over and over. I need change and I am that person who first eats with my eyes. I love Pinterest because I can pin all the food that strikes my attention and then later go back and give it a try. Well this recipe came from a blog I found on Pinterest. I re pinned it and wrote down what I needed to make it. I made it for dinner last night. I have to say I am always nervous when I try a new recipe because it could turn out horrible and that just sucks. However, this time it turned out amazing. Everyone of in my family loved it. Even my picky eaters, Coolidge and Brody devoured it. Here is the recipe I got from Kitchen Confidante Try it and let me know if you think it is as delish as I do. 

I did not grill mine. I live in a tiny NYC apartment so I followed the instructions for the oven. If you have a grill I say go for it. I have to say that mine looked and tasted just as though it came right off the grill. 


  • 4-5 garlic cloves, finely minced or crushed
  • 2 tablespoons balsamic vinegar
  • 2 1/2 teaspoons coarse salt
  • 1/2 teaspoon freshly ground pepper
  • 2 tablespoons olive oil
  • 2 pork tenderloins (about 1¼ pounds each)
  • 2 tablespoons canola oil (if preparing in oven)
Stir together garlic, balsamic vinegar, salt, pepper, and olive oil in a small bowl. Rub the paste all over pork. If you like or have the time, marinate overnight. If not, no worries, it will still be great!
Grill preparation:
Sear the tenderloins on all sides, then grill for about 20-30 minutes, rotating every 10 minutes, until the internal temperature is 145 degrees. Try to let it rest before slicing.
Oven preparation:
Preheat oven to 400 degrees.
Heat canola oil in a large, heavy saute pan over medium-high heat.  Working in batches if necessary, add pork, and brown all over, about 4 minutes.
Transfer pan to oven. Roast pork, turning occasionally, until the internal temperature is 145 degrees, about 20 minutes. Transfer pork to a cutting board, and try to let it rest 10 minutes before slicing.

Monday, January 23, 2012

Cleaning Microwave

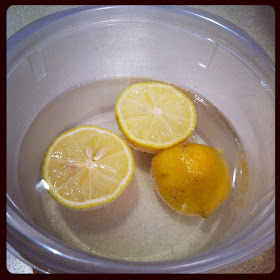
I don't think anyone likes cleaning a microwave. Let's face I don't like cleaning anything. If you are as busy as me you don't get the chance to wipe it down every time you use it and it starts to get splattered and smell like the food, then this is the best trick for you. I bought a book a long time ago called the Queen of Clean and learned a very cool trick to cleaning my microwave easily and it smells wonderful when I am done.

1st cut a lemon in half and stick it in about 2 cups of water in a microwave safe bowl. I added another old piece of lemon just because I was about to throw it out anyway. 2 nd put the bowl of water and lemons in the microwave and cook on high for 3 minutes. Sometimes 3 minutes is just enough depending on how dirty the microwave was. If it is very moist inside and all the stains look wet then you are done. If not do it for another 3 minutes. 3 rd remove the bowl and plate and spray with a mild cleaner. You don't need the cleaner but makes it just that much easier to wipe. I have used cleaner on the tougher messes but most of the time you don't even need a cleaner. 4 th wipe with a sponge and clean your plate and it should turn out sparkling and smelling like lemons or no scent at all.

Try it and let me know what you think.

Thursday, January 19, 2012

Roasted Chicken

After many failures finally figured out how to roast a chicken to perfection. After I thought I couldn't make it any better, I stumbled across a blog called She wears many hats and found a roasted turkey with mayo that knocked me off my chair. I decided to try this fabulous idea on my chicken that I had planned to make for dinner. She used fresh herbs on hers but I didn't have any so I used dried Italian seasoning. Basically what I learned from her was to add mayo and herbs to the skin along with butter in the cavity. But the rest is my old method. I have to say thank you to Amy because my roasted chicken is now PERFECT. What I love about cooking is that I constantly learn new tricks from other cooks. Looking forward to try it with fresh herbs.  

Ingredients

1 whole chicken
3 tbs mayo
2 tsp Italian seasoning
salt and pepper
1/4 stick of butter
5 cloves garlic

Directions

Heat oven to 375 degrees. slather mayo all over the entire chicken. sprinkle dried herbs and salt and pepper. Don't be stingy make sure the whole bird gets a little something. Put the 1/4 stick of butter and garlic cloves in the cavity. Bake for 1 1/2 hours. Don't forget to let the chicken sit for at least 20 minutes. I have mine stand for 30 because I feel it keeps all the juices in and taste much better. I have made the mistake of cutting into it too early because I can't wait and all the juice runs out and the chicken is too dry. 

If you want to make a pan gravy and I highly recommend you do, follow these easy steps.

Ingredients

2 tbs butter
4 tbs flour
1 can of chicken broth

Directions

Add butter to the pan that you roasted the chicken in. Let it melt on medium heat. Add flour and blend together until it is bubbling. Add chicken broth slowly while scraping all the yummy bits of chicken off the bottom. Let it simmer and it will slowly thicken. Let me know if you think it is delish.


Pan Gravy

Tuesday, January 17, 2012

Doughnut Muffins

A friend of mine brought these muffins to a party and I couldn't stop thinking about them for weeks after. So I googled the recipe and later was given the book as a gift. If you look back in my posts in November you see I made Jam filled muffins. These both came from the same book. I feel it is great because it has at least 4 recipes that I have used and loved. That is my criteria for buying cookbooks and so far it has been wonderful. Below is the recipe off Williams-Sonoma website. The only thing I did different is that I made 18 mini muffins instead of 9 standard. I loved how they turned out and my family devoured them. I also popped them in the oven later to warm them up and they tasted just like a sugar doughnut fresh out of the oven. Try these and I bet your family and friends will also think they are delish.


Ingredients:

For the muffins:

  • 7 Tbs. unsalted butter, at room temperature
  • 2/3 cup sugar
  • 1 egg
  • 1 1/2 cups all-purpose flour
  • 1 1/2 tsp. baking powder
  • 1/2 tsp. baking soda
  • 1/2 tsp. salt
  • 1/2 tsp. freshly grated nutmeg
  • 1/2 cup buttermilk
  • 1 1/2 tsp. vanilla extract

For the topping:

  • 2/3 cup sugar
  • 1 Tbs. ground cinnamon
  • 6 Tbs. (3/4 stick) unsalted butter, melted

Directions:

Preheat an oven to 350°F. Grease 9 standard muffin cups with butter or butter-flavored nonstick cooking spray; fill the unused cups one-third full with water to prevent warping.

To make the muffins, in the bowl of an electric mixer fitted with the flat beater, combine the butter and sugar and beat on medium speed until light and fluffy. Add the egg and beat well until pale and smooth.

In another bowl, stir together the flour, baking powder, baking soda, salt and nutmeg. Add to the butter mixture in 2 additions, alternating with the buttermilk and vanilla. Stir just until evenly moistened. The batter will be slightly lumpy.

Spoon the batter into the prepared muffin cups, filling each three-fourths full. Bake until the muffins are golden, dry and springy to the touch and a toothpick inserted into the center of a muffin comes out clean, 20 to 25 minutes (mini muffins for 15 min). Transfer the pan to a wire rack and let cool for 5 minutes. Unmold the muffins and let stand until cool enough to handle.

To make the topping, in a small, shallow bowl, stir together the sugar and cinnamon. Put the melted butter in another small bowl. Holding the bottom of a muffin, dip the top into the melted butter, turning to coat it evenly. Immediately dip the top in the cinnamon-sugar mixture, coating it evenly, then tap it to remove excess sugar. Transfer the muffin, right side up, to the rack. Repeat with the remaining muffins. Let cool completely before serving. Makes 9 muffins.


Friday, January 13, 2012

Steak

I love steak and have loved it since I was a child. My favorite steak is Fillet Mignon. I like to buy them at Costco because you get 4 of them for a great price. I don't like freezing meat especially steak. I think it adds a weird after taste so If I buy them I make them that day. The trick to of making a steak juicy and perfectly pink inside is temperature and cooking time. These sort of steaks usually come very thick. So you will probably cook them at least 5 minutes on each side. The first step is to make the pan very hot with olive oil. While it is heating salt and pepper the steak. I like to add some seasoning salt because I think beef needs lots of salt because it gets absorbed very easily. Once it is piping hot place it in the pan. The hot oil will create a crust that seals in all the flavor. Cook for at least 5 minutes. If they are real thick add 3 more minutes. salt and pepper the other side and then flip. Cook the other side another 5-8 minutes. Once there is only 2 minutes left, pour 2 tbs of Worcestershire over each steak. It just creates a nice tasty glaze. You can tell how done it is by pressing the middle of the steak. The squishier it is the more rare it is in the inside. If you can't push it down at all it is well done and that is NOT good. It may take you a couple of times to figure it out. I have under cooked them and I have over cooked them through the whole learning process. Don't be afraid just give it a try. Let me know how they turned out. 

Thursday, January 12, 2012

Apple Tarte Tatin

My first time ever seeing one of these was when my boss made one for a party she was hosting. She got the idea from Martha Stewart Entertaining. It looked incredibly easy so years later I decided to try and make one myself. I followed Martha's pie dough recipe and her Tarte Tatin recipe. It looks fancy and hard but it is actually quite easy and always comes out delish. This is about the third one I have made. My mother was in town and she really wanted me to make one so I surprised her. I tried to make it in my cast iron skillet. I am not sure what went wrong but the carmel sauce crystallized. I quickly made a new carmel sauce in a sauce pan and then poured it into a cake pan. That process worked out much better. Try it and let me know what you think.

Pate Brise

1 1/4 c. all purpose flour
1/2 tsp salt
1/2 tsp sugar
1/2 cup cold unsalted butter cut into small pieces

Directions

In a food processor, pulse flour, salt and sugar several times. Add butter and pulse until it resembles coarse meal. Add 2 tbs of ice water and pulse until dough just comes together. Don't over mix. Turn onto plastic wrap and press down into a disc. wrap up and chill for 1 hour. Roll out chilled dough into about 10 inches. Place on a baking sheet and chill until carmel sauces and apples are ready.


Filling

3-4 Granny smith apples
1 dash of lemon
1 cup sugar
4 tbs unsalted butter cut into small pieces
2tbs ice water

Directions

Pre heat oven to 425 degrees.

Peel apples and core. Slice apples in half. I cut some of the them smaller because I like the whole tart filled with apples but some leave a little gap here and there. In a sauce pan mix together sugar, 2 tbs cold water and lemon juice. Bring to a boil over high heat and cook until mixture turns amber, about 3 minutes. Remove pan from heat. Pour mixture into cake pan. Immediately add small pieces of butter distributing it evenly.

Arrange apples, rounded sides down around the bottom of the pan In a circular pattern. I start with one in the middle and them arranging them around it. Fit them as close together as possible and remember that is will be flipped so the bottom is what you will see. Try to make it as pretty as possible.

Take the pie crust out and drape over the top. cut excess off and make sure the top is completely covered. Bake for 25 minutes. Remove from oven and invert soon after. You don't want it to cool to much because it will then stick to the pan. I invert mine onto a plate that I want to serve it on. You can invert it on to a baking sheet and then transfer to plate but that is too much work for me. I am horrible at inverting it so I make my husband do it.

Trust me this is easy and delish so give it a try.


Wednesday, January 4, 2012

Hashbrown Quiche


I saw Paula Dean make a hash brown quiche once on the food network and I have been making them ever since. Hash browns have been a favorite of mine since I was a kid. However I didn't start liking quiche until my twenties. Now love them together. If you make this you will rarely find a piece  leftover. I altered Paul Deans recipe to what I like best. This Christmas I made one with sausage. It is quite easy to make and super delish. Try it and leave a comment.

Ingredients

1 package of shredded potatoes
4 tbs melted butter
3 large eggs
1 c. half and half
8 slices of bacon chopped up and fried until crisp
1/4 c. scallions
1 c. shredded Swiss cheese
salt and pepper

Directions

Pre heat oven to 450 degrees

In a 9 inch pie plate, toss melted butter and hash browns. Gently press hash browns into the bottom of plate and sides to form crust. Bake for 20-25 minutes or until golden brown. while that is cooking cook bacon until crisp.

In a large bowl mix together eggs, half and half, and salt and pepper. Add cheese, bacon, sausage, and scallions to bottom of the crust. Pour egg mixture evenly over the top. Return back to the oven and lower temperature to 350 degrees. Bake for 30 minutes or until it is puffed up and golden brown. Let rest and then slice.

Bacon Egg Sandwich

First time I ever had a bacon egg sandwich was from a diner here in NYC. They are usually made on a Kaiser roll but sometimes on a bagel or even a croissant. I like them on all three. The trick to these sandwiches is to cook the yolk all the way through but not too hard. I made this one with cheddar cheese but most are made with American cheese. It is best to toast the bagel with butter under the broiler so it softens up. Try one for breakfast or even lunch and let me know if you think it is delish.

Ingredients

2 eggs
1 everything bagel
2 slices cheddar cheese
3 slices of bacon
1 tbs butter
salt and pepper

Directions

In a non stick pan fry bacon until crisp. Remove and drain oil. Add two eggs and break up yolk with spatula. while that is cooking toast bagel with butter under broiler for 2 minutes. cook eggs for 1-2 minutes scramble it together and flip. Add cheese and cook 1 minute. flip one egg on top of the other. salt and pepper. layer eggs and bacon on the bottom of bagel and top and eat.